docker实现多版本php环境
目录
缘由
由于有个旧项目之前的运行环境是php5.6,但由于线上服务器已经都更新到php7.1以上版本,项目中部分代码不兼容php7导致报错,但旧项目的一些第三方组件已经没有基于php7的最新更新,我们需要再这些服务器要求重启这个项目并用于后续运营,所以很自然考虑到docker,云服务器上运行一个php56fpm的docker,用于专门处理这个项目动态请求。也就有了宿主机器nginx配合docker容器php-fpm实现单机php多版本环境。
单机多php环境,可以支持不同项目需要的不同php版本,也能用于测试不同版本php对项目的支持情况。
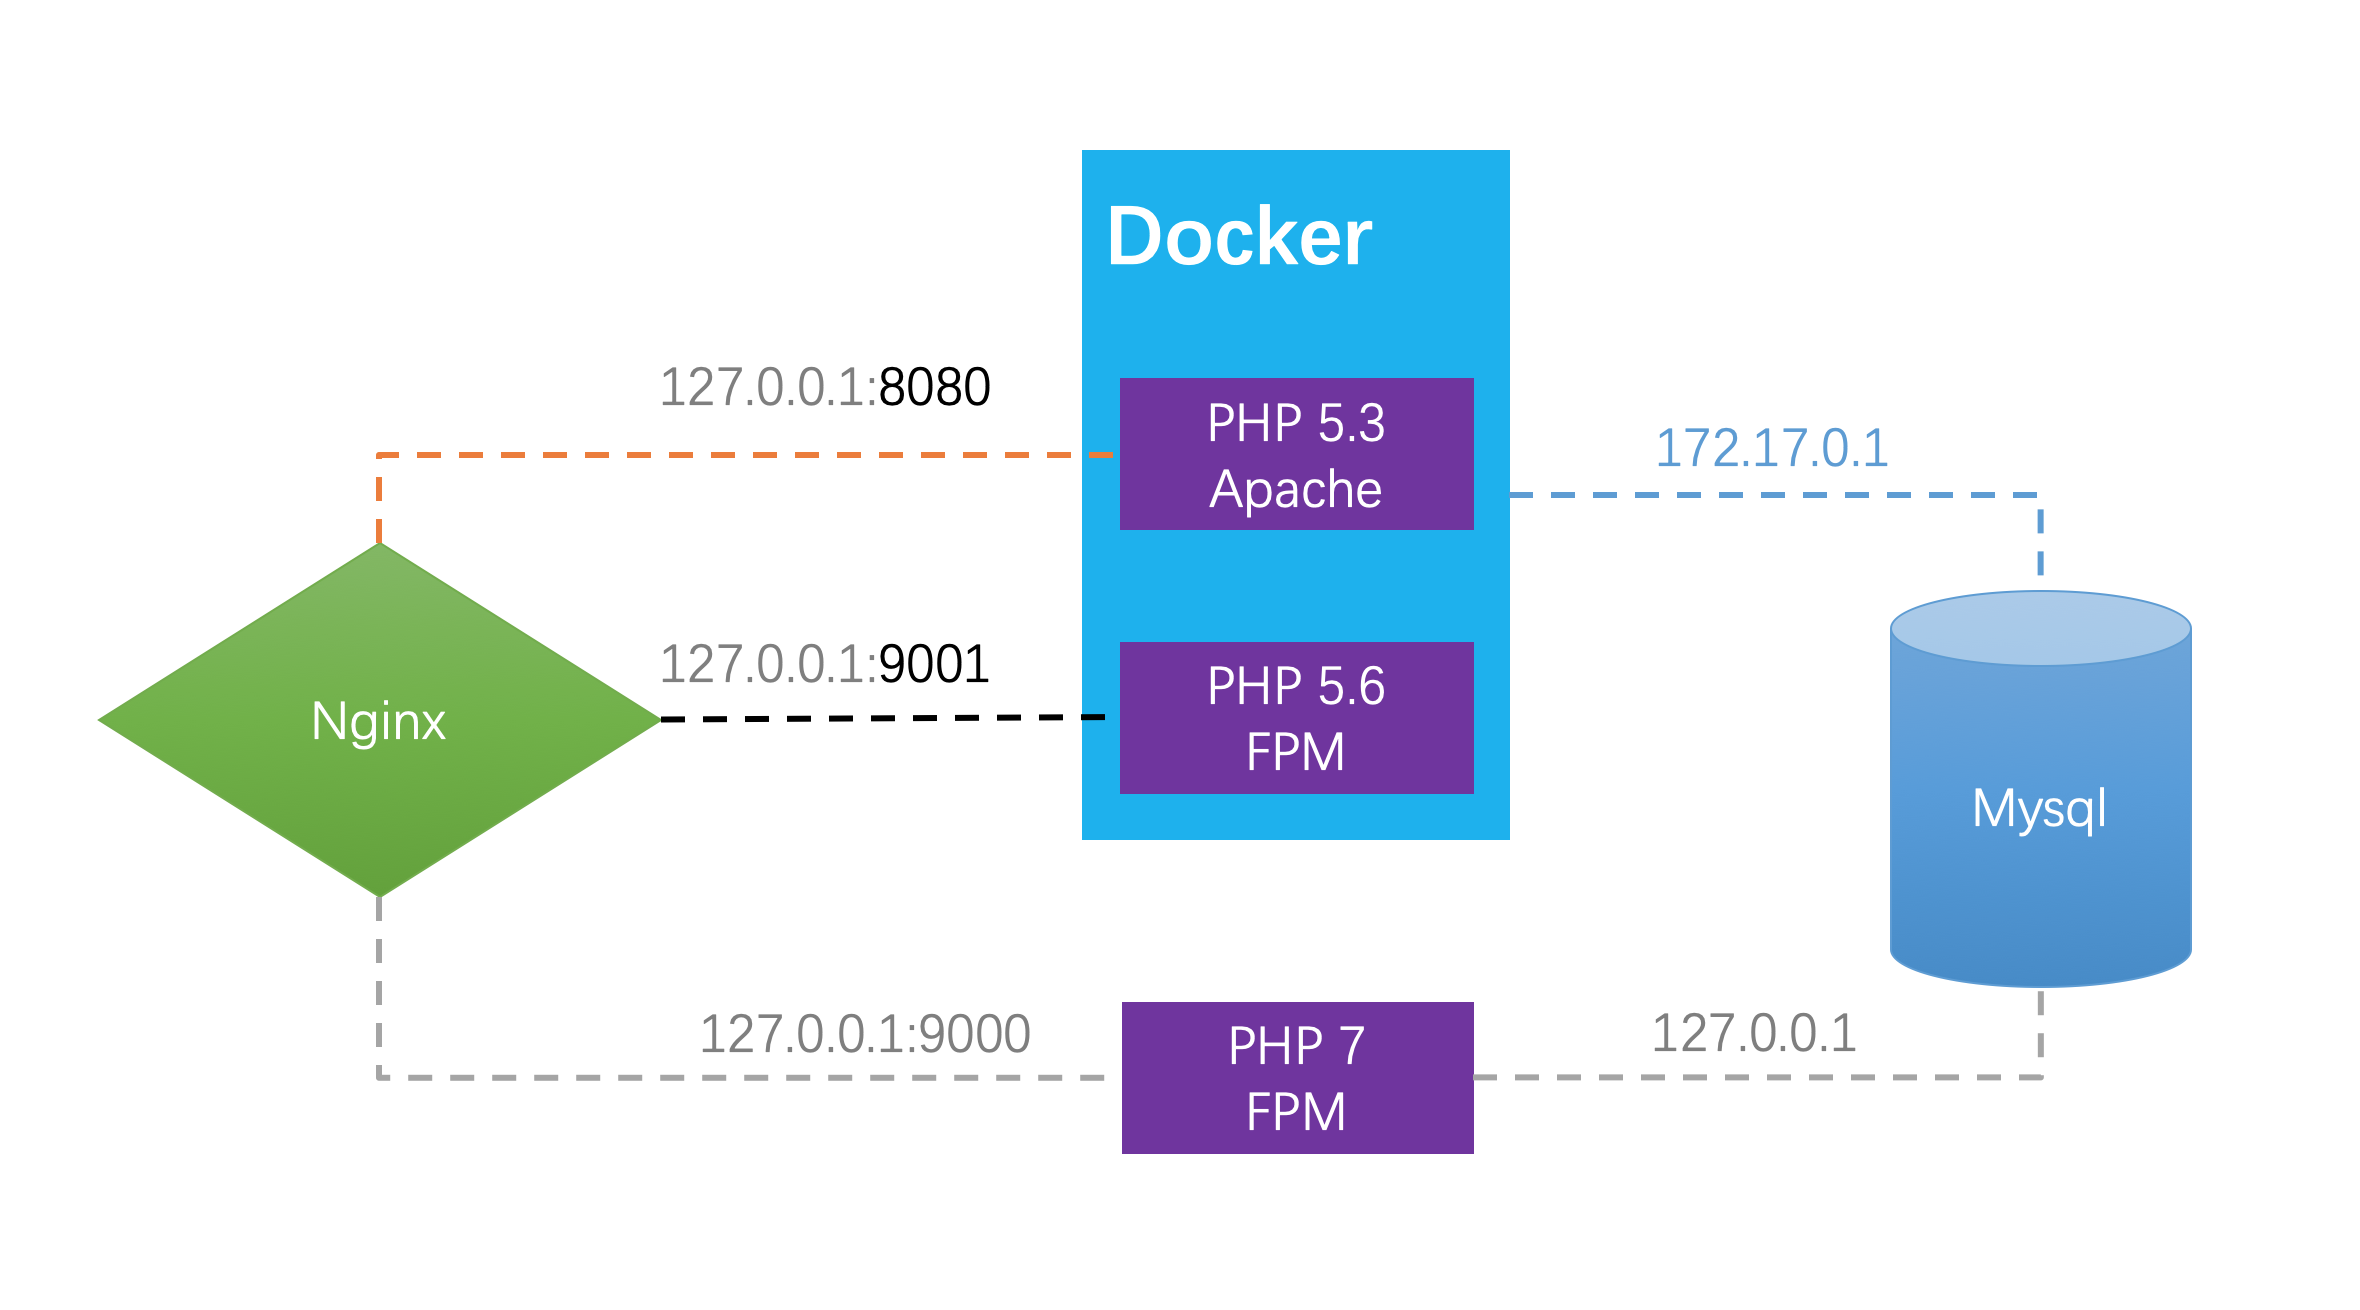
关系图
网上有张图把其中关系画的很清楚:

图片来源:csdn:IT宝哥哥
准备php-fpm镜像与容器
-
下载镜像
我们上Docker Hub找对应的php-fpm的docker,一开始使用这个最为简洁的mikolatero/php5.6-fpm-alpine - Docker Image | Docker Hub,但由于镜像中,php扩展部分缺失,比如mysql、mysqli等,且未带有docker-php-ext-install工具,允许我们方便的安装php扩展,所以没有采用这个更小的镜像,换成官方基础镜像php:5-fpm镜像:
jm@ubuntu:~$ sudo docker pull php:5-fpm这里查看所有官方php镜像的所有tag:php Tags | Docker Hub
-
创建并运行容器
jm@ubuntu:~$ sudo docker run --name php56fpm -p 9001:9000 -v /var/www/html:/var/www/html -d php:5-fpm- 创建并运行容器, 容器名为php6fpm;
- 宿主机器9001端口映射到9000,其实这里可以不做映射,后面我们在宿主机器nginx中是直接使用容器的端口;
- 将宿主机器/var/www/html目录挂载到容器对应目录/var/www/html,这里要保证目录名一致,因为我们的nginx在宿主机器上,所以静态资源的请求仍然是会访问宿主机器的/var/www/html下对应的资源文件,动态请求才会通过后续我们ngxin的配置,转发到容器的9000端口的php-fpm处理,这个时候访问的是容器中/var/www/html的php脚本。
-
确认容器服务端口
为了确认容器php56fpm服务端口是否正常,我们需要通过
telnet 容器ip 端口port检查端口状态:#首先查看容器实际分配的IP地址,了解到php56fpm容器的IPv4Address是172.17.0.2 jm@ubuntu:~$ sudo docker network inspect bridge "Containers": { "b96632a56faca9e57110647c41ec786f8d91e74fd82bf647967931a5b4df8534": { "Name": "php56fpm", "EndpointID": "12780a7a2d931e4da4d88b4424b64b4c4f1b9b4e59cf024b615f136e111dac3c", "MacAddress": "02:42:ac:11:00:02", "IPv4Address": "172.17.0.2/16", "IPv6Address": "" } }, # 检查容器php56fpm端口9000 jm@ubuntu:~$ telnet 172.17.0.2 9000因为docker所处于的默认bridge,IP:172.17.0.x 是可以直接访问宿主机以及外网的,后续的使用中,宿主机的服务就要通过宿主机的外部IP而不是127.0.0.1来访问。(默认bridge的网段也有可能是192.168.0.x)
注意:如果本地测试,使用虚拟机之类的模拟docker服务的话,有时可能需要重启虚拟机,才能保证正常访问容器端口。
容器中安装需要的php扩展
-
进入容器
jm@ubuntu:~$ sudo docker exec -it php56fpm /bin/bash -
查看容器中php已有的模块
php -m -
安装需要但未安装的模块
比如:
docker-php-ext-install mysql
docker-php-ext-install gd
docker-php-ext-install mbstring
docker-php-ext-install pdo_mysql
对于zip扩展的安装有一些依赖需要提前安装:
# 更新容器中软件库 apt update # 安装依赖(安装gd扩展等必须要先安装系统依赖) apt install libfreetype6-dev libmcrypt-dev libpng-dev libjpeg-dev libpng-dev sendmail zlib1g-dev # 安装zip扩展 docker-php-ext-install zip -
重启容器
先退出容器,再重启容器
sudo docker restart php56fpm
宿主机器ngxin的配置调整
未使用docker时的ngxin配置:
server {
        listen   80;
        server_name zreal.9ong.com;

        root /var/www/html/zreal.9ong.com/;
        access_log      /var/log/zreal.9ong.com.access.log;
        error_log       /var/log/zreal.9ong.com.error.log;

        location / {
                index index.html index.php;
                if (-d $request_filename) {
                        rewrite ^/(.*)([^/])$ http://$host/$1$2/ permanent;
                }
                if (-f $request_filename/index.html){
                        rewrite (.*) $1/index.html break;
                }
                if (-f $request_filename/index.php){
                        rewrite (.*) $1/index.php;
                }
                if (!-f $request_filename){
                        rewrite (.*) /index.php;
                }
        }
        location ~ [^/]\.php(/|$) {
               include /etc/nginx/snippets/fastcgi-php.conf;

               # With php7.0-cgi alone:
               # fastcgi_pass 127.0.0.1:9001;
               # With php7.0-fpm:
                fastcgi_pass unix:/run/php/php7.1-fpm.sock;
        }
        location ~ .*\.(gif|jpg|jpeg|png|bmp|swf|flv|mp4|ico)$ {
                expires 30d;
                access_log off;
        }
        location ~ .*\.(js|css)?$ {
                expires 7d;
                access_log off;
        }
        location ~ /\.ht {
                deny all;
        }

}
重点看其中对php脚本的处理:
location ~ [^/]\.php(/|$) {
        include /etc/nginx/snippets/fastcgi-php.conf;

        # With php7.0-cgi alone:
        # fastcgi_pass 127.0.0.1:9001;
        # With php7.0-fpm:
        fastcgi_pass unix:/run/php/php7.1-fpm.sock;
}
未使用docker前,是nginx直接转发给宿主机器的php7.1-fpm.sock来处理,而现在有了php56fpm的容器,只需要让nginx把php动态请求转发给php 56fpm容器的9000端口处理,可以处理如下:
location ~ [^/]\.php(/|$) {
        include /etc/nginx/snippets/fastcgi-php.conf;

        # With php7.0-cgi alone:
        # fastcgi_pass 127.0.0.1:9001;
        #将php动态请求转发给容器172.17.0.2的9000端口(容器中php-fpm服务端口)
        fastcgi_pass 172.17.0.2:9000;
        # With php7.0-fpm:
        # fastcgi_pass unix:/run/php/php7.1-fpm.sock;
}
除了php动态脚本的处理配置外,还需要注意除了远程资源外的项目本地静态资源(html、文本、js、css、图片等)处理,比如http://zreal.9ong.com/x.png
在配置root时,保证宿主机器和容器中都存在root目录:/var/www/html/zreal.9ong.com/,这样就能保证静态资源也能正常访问。
root /var/www/html/zreal.9ong.com/;
重新加载nginx服务:
sudo service nginx configtest
sudo service nginx reload
#或
sudo service nginx restart
测试
在宿主机器创建文件:
/var/www/html/zreal.9ong.com/index.php
<?php
phpinfo();
?>
/var/www/html/zreal.9ong.com/index.html
<div style="color:red;">from www.9ong.com</div>
浏览器访问:
http://zreal.9ong.com/index.php
http://zreal.9ong.com/index.html
容器文件读写权限
虽然上面能正常访问,但如果涉及容器中读写文件的话,需要容器中 /var/www/html/项目目录 的用户属主、属组及文件读写权限进行调整。
比如在宿主机器中,用户属主与属组分别是jm、jm,以下文件权限之前我们更换为775:
··· jm@ubuntu:/var/www/html/zreal.9ong.com$ ll
-rwxrwxr-x 1 jm jm 418 Sep 25 2013 index.php* -rwxrwxr-x 1 jm jm 19930 Apr 4 2018 license.txt* drwxrwxr-x 4 jm jm 4096 Jul 23 2016 reading/ -rwxrwxr-x 1 jm jm 7173 Nov 30 2017 readme.html* -rwxrwxr-x 1 jm jm 628 May 17 2016 robots.txt* -rwxrwxr-x 1 jm jm 20330 Oct 10 2015 sitemap_baidu.xml* -rwxrwxr-x 1 jm jm 33387 Apr 18 2019 sitemap.html* ···
但挂载到容器中后,属主与属组就发生了变化(因为在容器中未找到对应名称的属组和属主,就默认使用1000):
-rwxrwxr-x  1 1000 1000   418 Sep 24  2013 index.php
-rwxrwxr-x  1 1000 1000 19930 Apr  4  2018 license.txt
drwxrwxr-x  4 1000 1000  4096 Jul 23  2016 reading
-rwxrwxr-x  1 1000 1000  7173 Nov 29  2017 readme.html
-rwxrwxr-x  1 1000 1000   628 May 17  2016 robots.txt
-rwxrwxr-x  1 1000 1000 33387 Apr 18  2019 sitemap.html
-rwxrwxr-x  1 1000 1000 31799 Apr 18  2019 sitemap.xml
-rwxrwxr-x  1 1000 1000 20330 Oct 10  2015 sitemap_baidu.xml
我们查看容器中php-fpm的属主与属组的配置:
# 确认php-fpm.conf位置
root@b96632a56fac:/var/www/html/zreal.9ong.com# ps -aux
USER        PID %CPU %MEM    VSZ   RSS TTY      STAT START   TIME COMMAND
root          1  0.0  0.6 180060 19836 ?        Ss   03:42   0:00 php-fpm: master process (/usr/local/etc/php-fpm.conf)
www-data      6  0.4  2.8 398204 87268 ?        S    03:42   0:17 php-fpm: pool www
www-data      7  0.3  2.9 400776 91052 ?        S    03:42   0:13 php-fpm: pool www
www-data     41  0.3  2.0 301448 64176 ?        S    04:00   0:10 php-fpm: pool www
root         97  0.0  0.1  18144  3196 pts/0    Ss   04:31   0:00 /bin/bash
root        148  0.0  0.0  36640  2728 pts/0    R+   04:49   0:00 ps -aux

root@b96632a56fac:/var/www/html/zreal.9ong.com# cat /usr/local/etc/php-fpm.conf
[global]
include=etc/php-fpm.d/*.conf

root@b96632a56fac:/var/www/html/zreal.9ong.com# cat /usr/local/etc/php-fpm.d/
docker.conf     www.conf        zz-docker.conf

# 查看到属主是www-data
root@b96632a56fac:/var/www/html/zreal.9ong.com# cat /usr/local/etc/php-fpm.d/www.conf |grep user
; Unix user/group of processes
; Note: The user is mandatory. If the group is not set, the default user's group
user = www-data

# 查看到属组是www-data
root@b96632a56fac:/var/www/html/zreal.9ong.com# cat /usr/local/etc/php-fpm.d/www.conf |grep group
; Unix user/group of processes
; Note: The user is mandatory. If the group is not set, the default user's group
group = www-data

# 我们顺带看下容器中php-fpm确实是通过9000端口监听的,而不是socket
root@b96632a56fac:/var/www/html/zreal.9ong.com# cat /usr/local/etc/php-fpm.d/www.conf |grep listen
; Multiple pools of child processes may be started with different listening
; - 'listen' (unixsocket)
;   'ip.add.re.ss:port'    - to listen on a TCP socket to a specific IPv4 address on
;   '[ip:6:addr:ess]:port' - to listen on a TCP socket to a specific IPv6 address on
;   'port'                 - to listen on a TCP socket to all IPv4 addresses on a
;   '[::]:port'            - to listen on a TCP socket to all addresses
;   '/path/to/unix/socket' - to listen on a unix socket.
listen = 127.0.0.1:9000
所以我们需要将项目代码目录的属主和属组都更换为www-data、www-data,宿主机本身也有www-data,如果没有,可以通过adduser创建,然后通过chown递归更换属主与属组,再将项目目录递归chmod为755权限(可以在宿主机器执行):
jm@ubuntu:/var/www/html/$ chown www-data.www-data zreal.9ong.com -R
jm@ubuntu:/var/www/html/$ chmod 755 zreal.9ong.com -R
最终容器中的项目目录代码:
root@b96632a56fac:/var/www/html/zreal.9ong.com# ls -l
-rwxr-xr-x  1 www-data www-data   418 Sep 24  2013 index.php
-rwxr-xr-x  1 www-data www-data 19930 Apr  4  2018 license.txt
drwxr-xr-x  4 www-data www-data  4096 Jul 23  2016 reading
-rwxr-xr-x  1 www-data www-data  7173 Nov 29  2017 readme.html
-rwxr-xr-x  1 www-data www-data   628 May 17  2016 robots.txt
-rwxr-xr-x  1 www-data www-data 33387 Apr 18  2019 sitemap.html
-rwxr-xr-x  1 www-data www-data 31799 Apr 18  2019 sitemap.xml
-rwxr-xr-x  1 www-data www-data 20330 Oct 10  2015 sitemap_baidu.xml
这样可保证容器php-fpm服务有读写容器的项目目录与文件。
