sharding-proxy部署及php验证分片与读写分离
目录
- 为什么要使用sharding-proxy
- 准备mysql容器
- sharding-proxy相关概念
- 准备数据
- 准备sharding-proxy配置文件与jar包
- sharding-proxy容器启动
- 排查sharding-proxy服务失败原因
- sharding_ms_db逻辑数据库表
- 测试分片与读写分离
- 参考
如果分表的话比如order_1 , order_2 ,order_3…,每天都1千万 100天后就order_100了,怎么办呢?当然是分库分表了:
高并发系列:存储优化之也许可能是史上最详尽的分库分表文章之一
如果是日志记录(流水账之类)的话,我们还有其他建议,比如采用MongoDB、Elasticsearch等
为什么要使用sharding-proxy
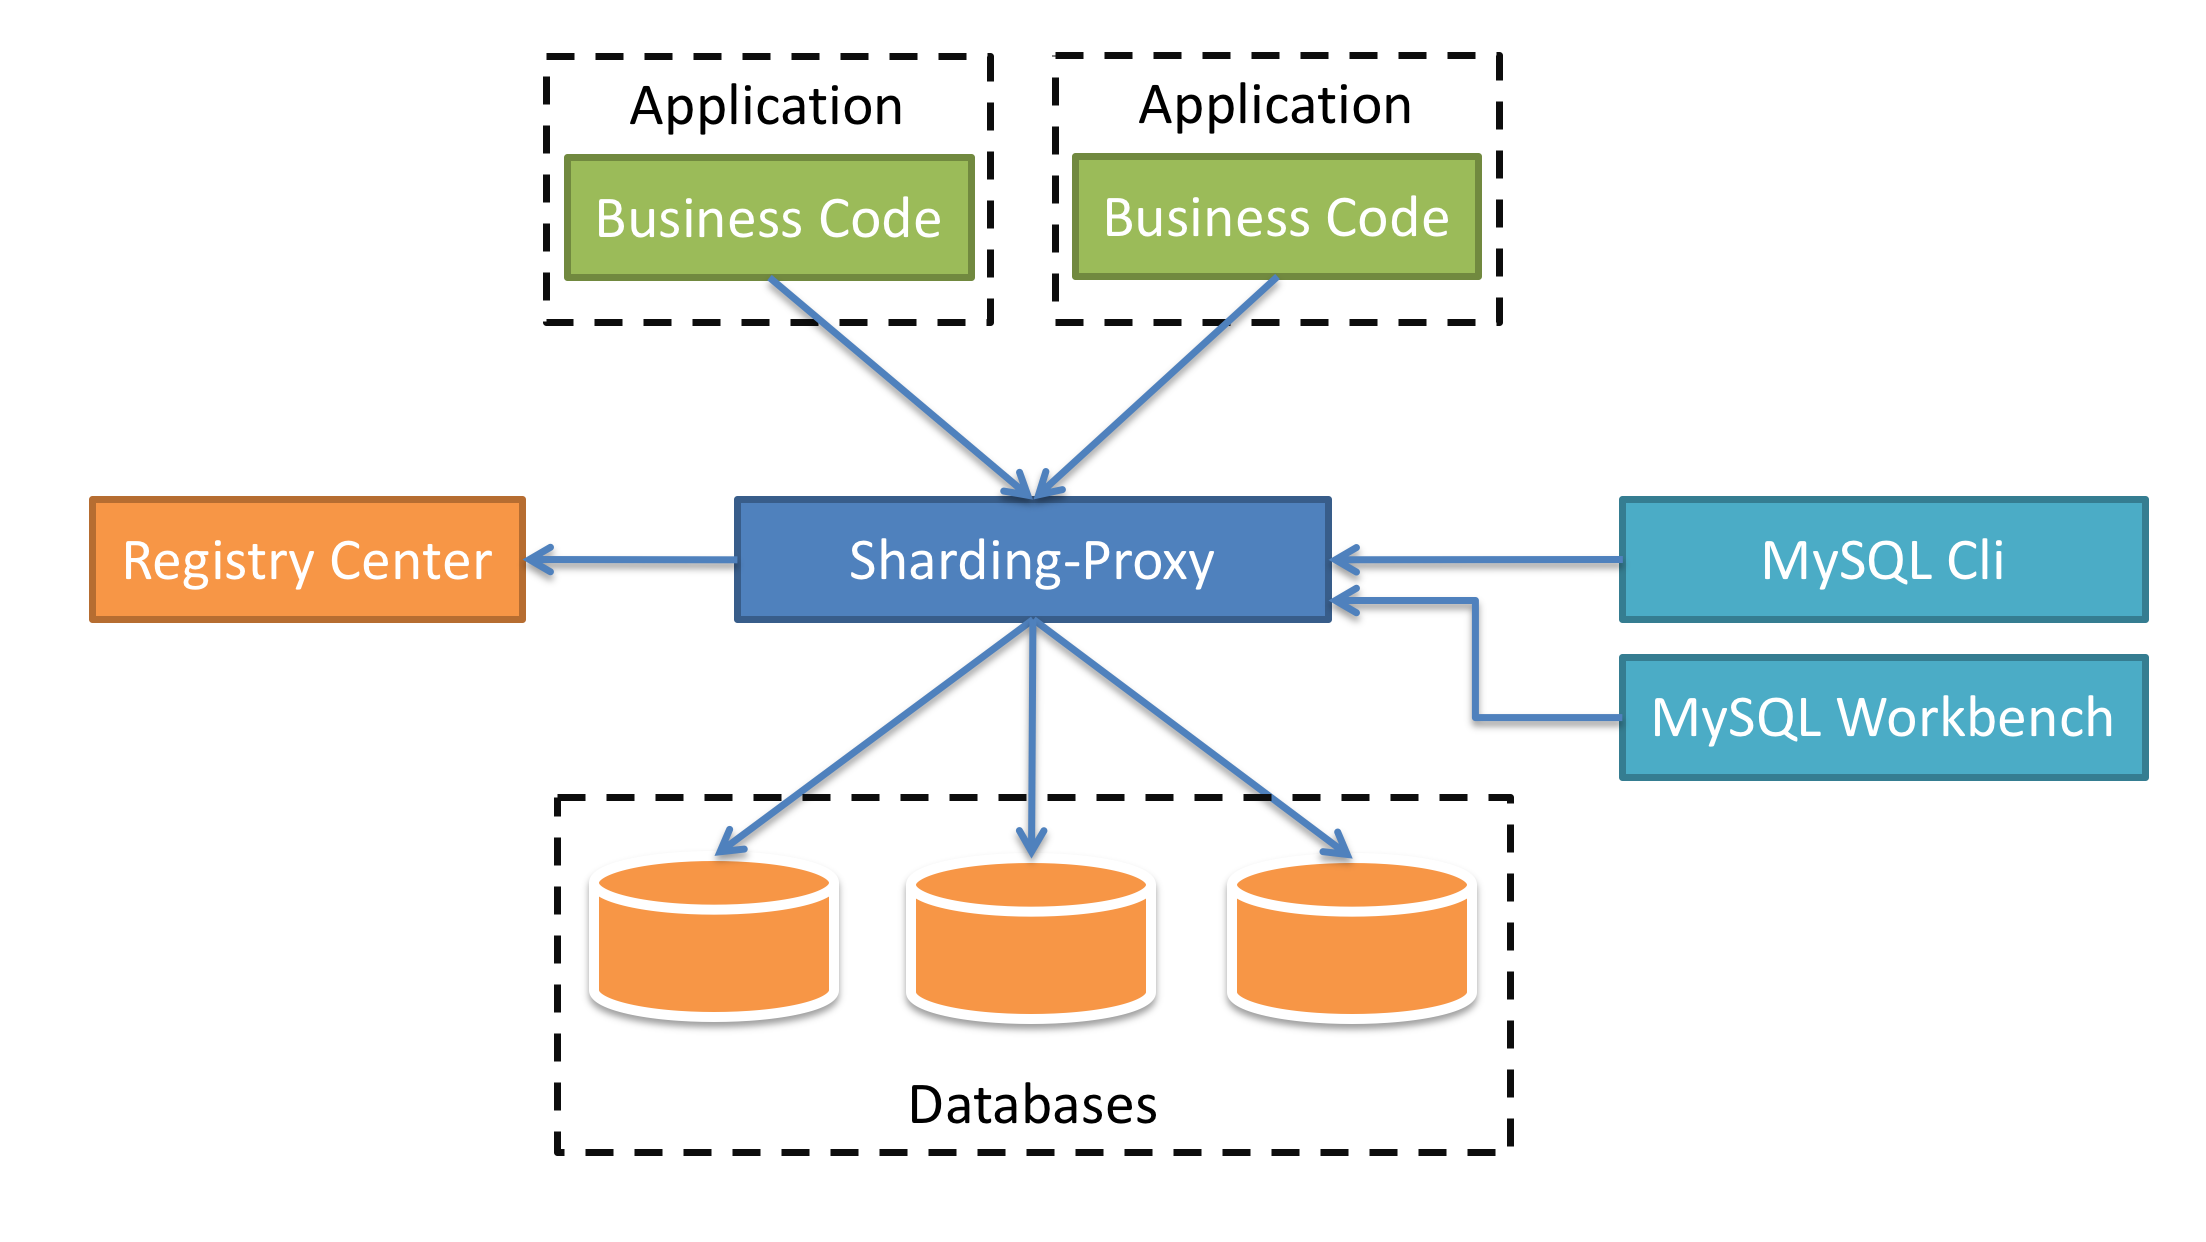
sharding-proxy是透明化的数据库代理端,提供封装了数据库二进制协议的服务端版本,用于完成对异构语言的支持。 目前先提供MySQL版本,它可以使用任何兼容MySQL协议的访问客户端(如:MySQL Command Client, MySQL Workbench等)操作数据,对DBA更加友好。
- 向应用程序完全透明,可直接当做MySQL使用。
- 适用于任何兼容MySQL协议的客户端。
我们可以通过sharding-proxy实现分库分表、读写分离,实现分库分表、读写分离逻辑与业务逻辑解耦,也就是将分片、读写分离逻辑下沉,解耦后,提升了数据库处理能力,简化了业务逻辑,方便DBA管理。
准备mysql容器
系统:ubuntu 16.04
# 下载mysql镜像
sudo docker pull mysql:5.7.25

# 运行mysql容器 主机3309端口->容器3306
sudo docker run --name=mysql01 -d -p 3309:3306 -e MYSQL_ROOT_PASSWORD=123456 mysql:5.7.25
确认
jm@ubuntu:~$ sudo docker ps -a
CONTAINER ID        IMAGE                   COMMAND                  CREATED             STATUS                      PORTS                               NAMES
986a639fcf50        mysql:5.7.25            "docker-entrypoint.s…"   3 minutes ago       Up 3 minutes                33060/tcp, 0.0.0.0:3309->3306/tcp   mysql01
d38c5dbcb91d        kibana:6.4.0            "/usr/local/bin/kiba…"   22 hours ago        Exited (137) 2 hours ago                                        kibana
32542d28592e        elasticsearch:6.4.0     "/usr/local/bin/dock…"   27 hours ago        Exited (143) 2 hours ago                                        elasticsearch
81ddc18cd4a8        rabbitmq:3-management   "docker-entrypoint.s…"   16 months ago       Exited (0) 3 months ago                                         Myrabbitmq
32a1361eb0ae        nginx:alpine            "nginx -g 'daemon of…"   16 months ago       Exited (0) 16 months ago                                        jm-php7-2-webserver
042f98a610b3        nginxphp_php-fpm        "/bin/sh -c /usr/bin…"   16 months ago       Exited (137) 3 months ago                                       jm-php7-2-php-fpm
客户端测试连接:
sharding-proxy相关概念
准备数据
t_user: 用户表,以id作为分片键
t_order: 订单表,以user_id作为分片键
t_user.id = t_order.user_id 且两张表为绑定表

t_user与t_order各分2个库,每个库分3张表,总共6张表

t_option: 单库单表,数据源位于ds_0
t_city: 广播表。广播表指所有的分片数据源中都存在的表,表结构和表中的数据在每个数据库中均完全一致。适用于数据量不大且需要与海量数据的表进行关联查询的场景,例如:字典表。

db0、db1、db0_slave、db1_slave,共分两个库db0与db1,两个库对应各自一个slave从库db0_slave、db1_slave
create database db0;
create database db1;
use db0;
drop table if exists t_user_0;
create table t_user_0(
    `id` bigint(20) not null,
    `name` varchar(100) not null default '' comment '用户名',
    primary key (`id`)
) engine=InnoDB default charset=utf8mb4 collate=utf8mb4_bin comment='用户表';
drop table if exists t_user_1;
drop table if exists t_user_2;
create table t_user_1 like t_user_0;
create table t_user_2 like t_user_0;
insert into t_user_0(`id`,`name`) value(6,'小明');


drop table if exists t_order_0;
create table t_order_0(
    `id` bigint(20) not null,
    `user_id` bigint(20) not null default 0 comment '用户id',
    primary key (`id`)
) engine=InnoDB default charset=utf8mb4 collate=utf8mb4_bin comment='订单表';
drop table if exists t_order_1;
drop table if exists t_order_2;
create table t_order_1 like t_order_0;
create table t_order_2 like t_order_0;
insert into t_order_0(`id`,`user_id`) value(1,6);


drop table if exists t_city;
create table t_city(
    `id` bigint(20) not null,
    `name` varchar(100) not null default '' comment '城市名',
    primary key (`id`)
) engine=InnoDB auto_increment=1 default charset=utf8mb4 collate=utf8mb4_bin comment='城市表';
insert into t_city(`id`,`name`) value(1,'北京');
insert into t_city(`id`,`name`) value(2,'上海');


drop table if exists t_option;
create table t_option(
    `id` bigint(20) not null auto_increment,
    `key` varchar(64) not null default '' comment 'key',
    `value` varchar(200) not null default '' comment 'value',
    primary key (`id`)
) engine=InnoDB auto_increment=1 default charset=utf8mb4 collate=utf8mb4_bin comment='配置表';
use db1;
drop table if exists t_user_0;
create table t_user_0(
    `id` bigint(20) not null,
    `name` varchar(100) not null default '' comment '用户名',
    primary key (`id`)
) engine=InnoDB default charset=utf8mb4 collate=utf8mb4_bin comment='用户表';
drop table if exists t_user_1;
drop table if exists t_user_2;
create table t_user_1 like t_user_0;
create table t_user_2 like t_user_0;


drop table if exists t_order_0;
create table t_order_0(
    `id` bigint(20) not null,
    `user_id` bigint(20) not null default 0 comment '用户id',
    primary key (`id`)
) engine=InnoDB default charset=utf8mb4 collate=utf8mb4_bin comment='订单表';
drop table if exists t_order_1;
drop table if exists t_order_2;
create table t_order_1 like t_order_0;
create table t_order_2 like t_order_0;


drop table if exists t_city;
create table t_city(
    `id` bigint(20) not null,
    `name` varchar(100) not null default '' comment '城市名',
    primary key (`id`)
) engine=InnoDB auto_increment=1 default charset=utf8mb4 collate=utf8mb4_bin comment='城市表';
insert into t_city(`id`,`name`) value(1,'北京');
insert into t_city(`id`,`name`) value(2,'上海');
# 再创建两个对应salve库,复制从db0和db1
create database db0_slave;
create database db1_slave;
准备sharding-proxy配置文件与jar包
文件目录结构如下:
jm@ubuntu:/mydata/sharding-proxy$ tree .
.
├── conf
│   ├── config-sharding.yaml
│   └── server.yaml
└── lib
    └── mysql-connector-java-5.1.49.jar
这些配置文件,后面我们会用于sharding-proxy 容器启动时,挂载到容器中,提供给容器读取。
-
mysql-connector-java
JAVA通过jdbc访问mySQL数据库时需要该包支持。
-
全局配置server.yaml
Sharding-Proxy使用conf/server.yaml配置注册中心、认证信息以及公用属性。
server.yaml
# 认证信息 authentication: # 账户密码设置 users: root: password: 123456 #props: # max.connections.size.per.query: 1 # acceptor.size: 16 # The default value is available processors count * 2. # executor.size: 16 # Infinite by default. # proxy.frontend.flush.threshold: 128 # The default value is 128. # # LOCAL: Proxy will run with LOCAL transaction. # # XA: Proxy will run with XA transaction. # # BASE: Proxy will run with B.A.S.E transaction. # proxy.transaction.type: LOCAL # proxy.opentracing.enabled: false # proxy.hint.enabled: false # query.with.cipher.column: true # sql.show: false # allow.range.query.with.inline.sharding: false -
数据源+分片配置config-sharding.yaml
config-sharding.yaml用于数据源与分片配置,server.yaml用于全局配置。
config-sharding.yaml
# proxy之后的数据库名
schemaName: sharding_db

# 数据源配置
dataSources:
ds_0:
    url: jdbc:mysql://db_host:3306/db0?useUnicode=true&characterEncoding=utf8&allowMultiQueries=true&zeroDateTimeBehavior=convertToNull
    username: root
    password: 123456
    connectionTimeoutMilliseconds: 30000
    idleTimeoutMilliseconds: 60000
    maxLifetimeMilliseconds: 1800000
    maxPoolSize: 50
ds_1:
    url: jdbc:mysql://db_host:3306/db1?useUnicode=true&characterEncoding=utf8&allowMultiQueries=true&zeroDateTimeBehavior=convertToNull
    username: root
    password: 123456
    connectionTimeoutMilliseconds: 30000
    idleTimeoutMilliseconds: 60000
    maxLifetimeMilliseconds: 1800000
    maxPoolSize: 50

# 分片规则
shardingRule:
tables:
    t_user:
    actualDataNodes: ds_${0..1}.t_user_${0..2}
    databaseStrategy:
        inline:
        shardingColumn: id
        algorithmExpression: ds_${id % 2}
    tableStrategy:
        inline:
        shardingColumn: id
        algorithmExpression: t_user_${id % 3}
    keyGenerator:
        type: SNOWFLAKE
        column: id
    t_order:
    actualDataNodes: ds_${0..1}.t_order_${0..2}
    databaseStrategy:
        inline:
        shardingColumn: user_id
        algorithmExpression: ds_${user_id % 2}
    tableStrategy:
        inline:
        shardingColumn: user_id
        algorithmExpression: t_order_${user_id % 3}
    keyGenerator:
        type: SNOWFLAKE
        column: id
    t_option:
    actualDataNodes: ds_${0}.t_option
    t_city:
    actualDataNodes: ds_${0..1}.t_city
bindingTables:
    - t_user,t_order
broadcastTables:
    - t_city
需要注意几个点:
- 单库单表的actualDataNodes不能直接写成ds_0.t_option,否则它还是会在两个数据库中轮训去查表。(t_option表)
- 广播表一定要在broadcastTables下声明,否则在逻辑库表中会出现数据重复。(t_city)
-
数据源+分片+主从配置config-sharding-ms.yaml
# proxy之后的数据库名
schemaName: sharding_ms_db

# 数据源配置
dataSources:
    ds_0:
        url: jdbc:mysql://db_host:3306/db0?useUnicode=true&characterEncoding=utf8&allowMultiQueries=true&zeroDateTimeBehavior=convertToNull
        username: root
        password: 123456
        connectionTimeoutMilliseconds: 30000
        idleTimeoutMilliseconds: 60000
        maxLifetimeMilliseconds: 1800000
        maxPoolSize: 50
    ds_1:
        url: jdbc:mysql://db_host:3306/db1?useUnicode=true&characterEncoding=utf8&allowMultiQueries=true&zeroDateTimeBehavior=convertToNull
        username: root
        password: 123456
        connectionTimeoutMilliseconds: 30000
        idleTimeoutMilliseconds: 60000
        maxLifetimeMilliseconds: 1800000
        maxPoolSize: 50
    ds_0_slave:
        url: jdbc:mysql://db_host:3306/db0_slave?useUnicode=true&characterEncoding=utf8&allowMultiQueries=true&zeroDateTimeBehavior=convertToNull
        username: root
        password: 123456
        connectionTimeoutMilliseconds: 30000
        idleTimeoutMilliseconds: 60000
        maxLifetimeMilliseconds: 1800000
        maxPoolSize: 50
    ds_1_slave:
        url: jdbc:mysql://db_host:3306/db1_slave?useUnicode=true&characterEncoding=utf8&allowMultiQueries=true&zeroDateTimeBehavior=convertToNull
        username: root
        password: 123456
        connectionTimeoutMilliseconds: 30000
        idleTimeoutMilliseconds: 60000
        maxLifetimeMilliseconds: 1800000
        maxPoolSize: 50

# 分片规则
shardingRule:
    masterSlaveRules:
        ms_ds_0:
            masterDataSourceName: ds_0
            slaveDataSourceNames:
                - ds_0_slave
        ms_ds_1:
            masterDataSourceName: ds_1
            slaveDataSourceNames:
                - ds_1_slave
    tables:
        t_user:
            actualDataNodes: ms_ds_${0..1}.t_user_${0..2}
            databaseStrategy:
                inline:
                    shardingColumn: id
                    algorithmExpression: ms_ds_${id % 2}
            tableStrategy:
                inline:
                    shardingColumn: id
                    algorithmExpression: t_user_${id % 3}
            keyGenerator:
                type: SNOWFLAKE
                column: id
        t_order:
            actualDataNodes: ms_ds_${0..1}.t_order_${0..2}
            databaseStrategy:
                inline:
                    shardingColumn: user_id
                    algorithmExpression: ms_ds_${user_id % 2}
            tableStrategy:
                inline:
                    shardingColumn: user_id
                    algorithmExpression: t_order_${user_id % 3}
            keyGenerator:
                type: SNOWFLAKE
                column: id
        t_option:
            actualDataNodes: ms_ds_${0}.t_option
        t_city:
            actualDataNodes: ms_ds_${0..1}.t_city
    bindingTables:
        - t_user,t_order
    broadcastTables:
        - t_city
    defaultDatabaseStrategy:
        inline:
            shardingColumn: user_id
            algorithmExpression: ms_ds_${user_id % 2}
    defaultTableStrategy:
        none:
    defaultDataSourceName: ms_ds_0
注意: masterSlaveRules 是复数形式,支持设置多主多从配置。dataSources配置了初始的数据源,而masterSlaveRules在dataSources的基础上配置了主从的数据源,所以最后tables规则中的配置nodes时,应该采用masterSlaveRules设置的主数据源,比如ms_ds_0与ms_ds_1。
还有个masterSlaveRule配置,单数,不是复数,这个单数的masterSlaveRule只支持设置一主(多从):
dataSources:
...
...
masterSlaveRule:
    name: ms_ds_0
    masterDataSourceName: ds_0
    slaveDataSourceNames:
        - ds_0_slave
        - ds_1_slave
sharding-proxy容器启动
sudo docker pull apache/sharding-proxy:4.1.1
sudo docker stop sharding
sudo docker rm sharding
sudo docker run --name sharding -d -p 3307:3307 -v /mydata/sharding-proxy/conf:/opt/sharding-proxy/conf -v /mydata/sharding-proxy/lib:/opt/sharding-proxy/ext-lib -e PORT=3307 --link mysql01:db_host apache/sharding-proxy:4.1.1
启动参数说明:启动sharding容器时,挂载了conf和lib两个目录,并赋予一个容器环境变量PORT,同时为我们之前启动的mysql01容器做了个link,快捷使用(比如在上面的config-sharding.yaml中的DataSource中的配置的使用)
jm@ubuntu:/mydata/sharding-proxy$ sudo docker ps -a
CONTAINER ID        IMAGE                         COMMAND                  CREATED             STATUS                      PORTS                               NAMES
ad1b3bc07cd9        apache/sharding-proxy:4.1.1   "/bin/sh -c '${LOCAL…"   7 seconds ago       Up 5 seconds                0.0.0.0:3307->3307/tcp              sharding
986a639fcf50        mysql:5.7.25                  "docker-entrypoint.s…"   About an hour ago   Up About an hour            33060/tcp, 0.0.0.0:3309->3306/tcp   mysql01
排查sharding-proxy服务失败原因
因为yaml配置比较复杂且细节容易出错,比如数据源写错、masterSlaveRule单数与复数、缩进等细节,导致启动失败,我们需要了解失败的原因。
上面我们采用docker的形式,在容器启动后,进入容器:
sudo docker exec -it sharding /bin/bash
在容器中我们看到一个tail的进程是输出stdout.log,这个文件就是存放服务启动的相关信息,也包括error、exception信息:
root@8e68e14aa212:/# ps -aux
USER        PID %CPU %MEM    VSZ   RSS TTY      STAT START   TIME COMMAND
root          1  0.0  0.0   4336   792 ?        Ss   13:04   0:00 /bin/sh -c ${LOCAL_PATH}/bin/start.sh ${PORT} && tail -f ${LOCAL_PATH}/logs/stdout.log
root          9  0.9 12.7 4174216 389568 ?      Sl   13:04   0:08 java -Djava.awt.headless=true -Djava.net.preferIPv4Stack=true -server -Xmx2g -Xms2g -Xmn1g -Xss256k -XX:+DisableExplicitGC -X
root         24  0.0  0.0   5960   684 ?        S    13:04   0:00 tail -f /opt/sharding-proxy/logs/stdout.log
root         34  1.1  0.1  21956  3564 pts/0    Ss   13:19   0:00 /bin/bash
root         41  0.0  0.0  19188  2404 pts/0    R+   13:20   0:00 ps -aux
所以我们通过docker logs是可以查看到容器的输出的:
sudo docker logs sharding
当然我们也可以直接打开或复制/opt/sharding-proxy/logs/stdout.log文件,查看文件内容,和docker logs查看到的内容是一样的。
比如以下我们发现Cannot find data source in sharding rule, invalid actual data node is: ‘ds_0.t_user_0’,这个错误是因为我们采用了分片+主从数据源的yaml配置,tables规则中仍然使用dataSources中的数据源ds_0等,而是应该使用ms_ds_0等主数据源。
Starting the Sharding-Proxy ...
The port is 3307
The classpath is /opt/sharding-proxy/conf:.:..:/opt/sharding-proxy/lib/*:/opt/sharding-proxy/lib/*:/opt/sharding-proxy/ext-lib/*
Please check the STDOUT file: /opt/sharding-proxy/logs/stdout.log
[INFO ] 12:39:06.419 [main] o.a.s.core.log.ConfigurationLogger - Authentication:
users:
  root:
    authorizedSchemas: ''
    password: '123456'

[INFO ] 12:39:06.425 [main] o.a.s.core.log.ConfigurationLogger - Properties:
{}
...
[INFO ] 12:39:08.052 [main] c.a.d.xa.XATransactionalResource - resource-4-ds_1_slave: refreshed XAResource
Exception in thread "main" org.apache.shardingsphere.underlying.common.exception.ShardingSphereException: Cannot find data source in sharding rule, invalid actual data node is: 'ds_0.t_user_0'
	at org.apache.shardingsphere.core.rule.TableRule.generateDataNodes(TableRule.java:160)
	at org.apache.shardingsphere.core.rule.TableRule.<init>(TableRule.java:106)
	at org.apache.shardingsphere.core.rule.ShardingRule.lambda$createTableRules$0(ShardingRule.java:91)
	at java.util.stream.ReferencePipeline$3$1.accept(ReferencePipeline.java:193)
	at java.util.LinkedList$LLSpliterator.forEachRemaining(LinkedList.java:1235)
...
sharding_ms_db逻辑数据库表
sharding-proxy容器正常启动后,我们就可以通过mysql客户端,按连接mysql的方式连接sharding-proxy服务,而我们将看到逻辑数据库sharding_ms_db:
jm@ubuntu:/mydata/sharding-proxy/conf$ mysql -h 127.0.01 -P 3307 -uroot -p
Enter password:
Welcome to the MySQL monitor.  Commands end with ; or \g.
Your MySQL connection id is 1
Server version: 8.0.20-Sharding-Proxy 4.1.0

Copyright (c) 2000, 2019, Oracle and/or its affiliates. All rights reserved.

Oracle is a registered trademark of Oracle Corporation and/or its
affiliates. Other names may be trademarks of their respective
owners.

Type 'help;' or '\h' for help. Type '\c' to clear the current input statement.

mysql> show databases;
+----------------+
| Database       |
+----------------+
| ms_sharding_db |
+----------------+
1 row in set (0.01 sec)

mysql> use ms_sharding_db;
sReading table information for completion of table and column names
You can turn off this feature to get a quicker startup with -A

Database changed
mysql> show tables;
+---------------+
| Tables_in_db0 |
+---------------+
| t_city        |
| t_option      |
| t_order       |
| t_user        |
+---------------+
4 rows in set (0.00 sec)

mysql> select * from t_city;
+----+--------+
| id | name   |
+----+--------+
|  1 | 北京   |
|  2 | 上海   |
+----+--------+
2 rows in set (0.04 sec)

mysql> select * from t_user;
+----+--------+
| id | name   |
+----+--------+
|  6 | 小明   |
+----+--------+
1 row in set (0.04 sec)
测试分片与读写分离
php写一个测试脚本sharding-proxy.php:
/**
 * @usage
 * php sharding-proxy.php get
 * php sharding-proxy.php insert
 **/
$op = isset($argv[1])?$argv[1]:"get";//get insert update delete

$my = new mysqli("192.168.8.130","root","123456","sharding_ms_db",3307);
if($my->connect_error){
    echo "mysql连接错误:".$my->connect_error;
    exit;
}


$insertSql= "insert into t_user(id,name) values(3,\"小鱼\")";
// $insertSql= "insert into t_user(id,name) values(10,\"香香\")";
$updateSql = "update t_user set(name=\"鱼儿\") where id=3";
$getSql = "select * from t_user where id=3";
$deleteSql = "delete from t_user where id=3";

$res = null;
switch ($op) {
    case 'get':
        if($res = $my->query($getSql)){
            while($row = $res->fetch_row()){
                print_r($row);
            }
        }
        break;
    case 'insert':
        if($res = $my->query($insertSql)){
            print_r($res);
        }

        break;
    case 'update':
        if($res = $my->query($updateSql)){
            print_r($res);
        }
        break;
    case 'delete':
        if($res = $my->query($deleteSql)){
            print_r($res);
        }
        break;
    default:
        print_r("op empty.");
        break;
}

is_resource($res) && $res->close();
$my->close();
注意:这里测试的前提是主从库需要配置数据同步,本次示例中,没有开启新的mysql实例用于做主从同步,仅仅是通过同一个mysql实例下的主从库模拟,手动同步,仅为了测试读写分离。之前写顺手记录的主从实例配置详见:mysql主从实例docker实现
-
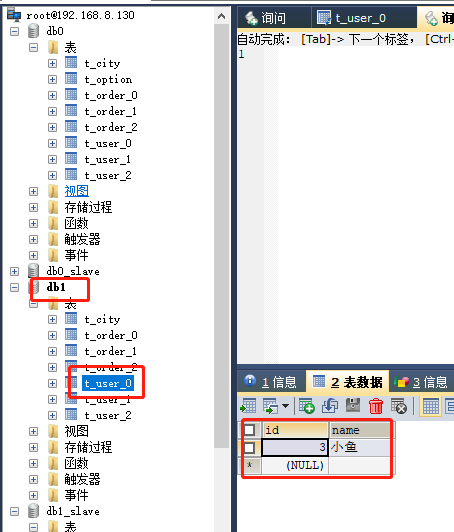
测试分片生效:insert一条数据(id=3,name="小鱼”),将写入ms_ds_1的主数据源,也就是ds_1,而ds_1数据源对应的是物理数据库db1,也就是说,数据将写入db1.t_user_0表,同时将同步到db1_slave.t_user_0表中。
-
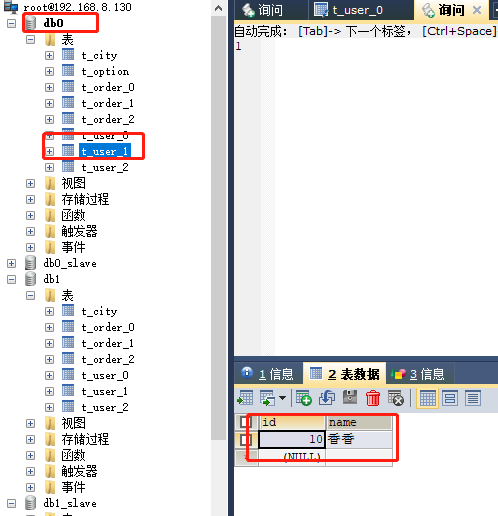
测试分片生效:insert一条数据(id=10,name="香香”),将写入ms_ds_0的主数据源,也就是ds_0,而ds_0数据源对应的是物理数据库db0,也就是说,数据将写入db0.t_user_1表,同时将同步到db0_slave.t_user_1表中。确认分片的同时,也可以确认写到主库后,再同步到从库。
-
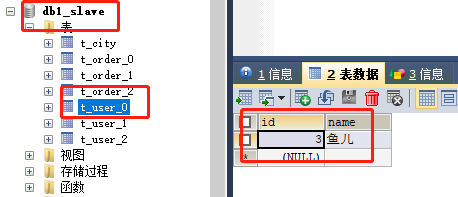
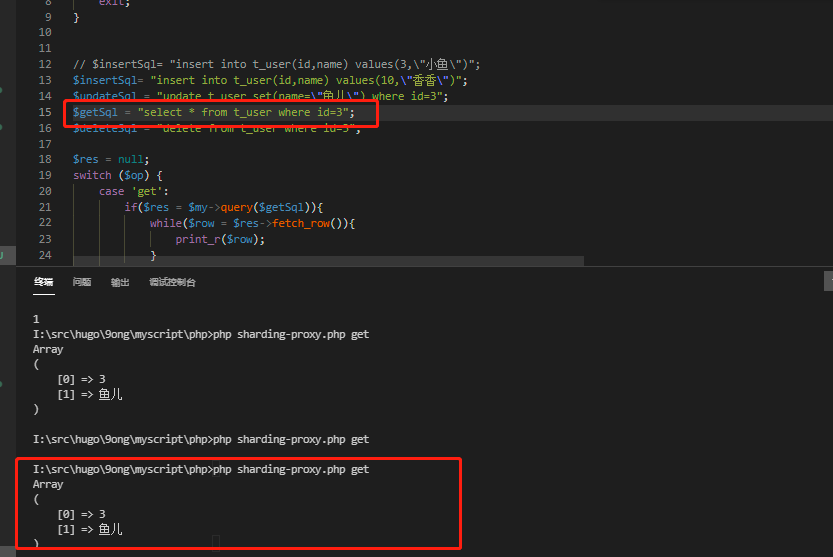
测试读写分离:手动修改db1_slave.t_user_0表中id=3的记录,将name更改为"鱼儿”,然后通过get获取id=3的记录信息,根据读写分离原则,将从db1_slave.t_user_0表中获取,也就是获得的记录中name="鱼儿”,而不是db1.t_user_0表中id=3记录中name="小鱼”。确认读从库。
测试结果:
参考
Releases · apache/shardingsphere
Sharding-Proxy的基本功能使用 - 牛初九 - 博客园
安装Sharding-Proxy · tp6 Sharding-Proxy企业分库分表最佳实践 · 看云
sharding-ui实现sharding-proxy动态更新分库分表规则_batman-CSDN博客
