yar结合consul实现微服务
目录
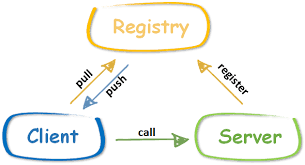
RPC图
rpc服务扩展yar
-
准备rpc服务User
User.php
namespace yar\server; class User { /** * get user name * @return string */ public function getName() { return "tsingchan from port:".$_SERVER['SERVER_PORT']; } /** * get user info * @return array */ public function getInfo(){ return [ "name"=>"tsingchan", "id"=>"350588", "phone"=>"1310000000" ]; } } $server = new \Yar_Server(new User()); $server->handle();//启动服务, 开始接受客户端的调用请求. 来自客户端的调用, 都是通过POST请求发送过来的 -
准备rpc服务Operator
Operator.php
namespace yar\server; class Operator { /** * Add two operands * @param interge * @return interge */ public function add($a, $b) { if(!$a || !$b){ throw new Exception("server exception:a | b不能为空."); } return $this->_add($a, $b); } /** * Sub */ public function sub($a, $b) { return $a - $b; } /** * Mul */ public function mul($a, $b) { return $a * $b; } /** * 返回一个数组 * @return array */ public function returnArray(){ return ['a'=>"apple","b"=>'banana']; } /** * Protected methods will not be exposed * @param interge * @return interge */ protected function _add($a, $b) { return $a + $b; } } $server = new \Yar_Server(new Operator()); $server->handle();//启动服务, 开始接受客户端的调用请求. 来自客户端的调用, 都是通过POST请求发送过来的 -
准备health.php,用于consul服务健康检查
health.php
header('Content-type: application/json'); echo "SUCCESS"; -
准备端口8091,解析rpc服务(User、Operator)
-
准备端口8092,解析rpc服务(User、Operator),可以稍微改动,用于测试是否达到负载均衡的效果
-
准备端口8093,负载均衡到8091与8092
upstream yar.rpc {
    server 192.168.8.130:8091;
    server 192.168.8.130:8092;
}
server {
        listen       8093;
        server_name 192.168.8.130;
        access_log  /var/log/nginx/yar-rpc.access.log;

        location /{
                proxy_pass        http://yar.rpc;
                proxy_set_header   Host             $host;
                proxy_set_header   X-Real-IP        $remote_addr;
                proxy_set_header   X-Forwarded-For  $proxy_add_x_forwarded_for;
        }
}
server {
        listen 8091;

        server_name 192.168.8.130;

        root /var/www/html/php-shiyanchang/yar1;
        index index.html index.php;

        location / {
                if (!-e $request_filename) {
                        rewrite  ^(.*)$  /index.php?s=/$1  last;
                        break;
                }
        }
        location ~ \.php$ {
            include /etc/nginx/snippets/fastcgi-php.conf;
            fastcgi_pass unix:/run/php/php7.1-fpm.sock;
        }
        location ~ .*\.(gif|jpg|jpeg|png|bmp|swf|mp3)$ {
                expires      30d;
        }

        location ~ .*\.(js|css)?$ {
                expires      12h;
        }
}
server {
        listen 8092;

        server_name 192.168.8.130;

        root /var/www/html/php-shiyanchang/yar1;
        index index.html index.php;

        location / {
                if (!-e $request_filename) {
                        rewrite  ^(.*)$  /index.php?s=/$1  last;
                        break;
                }
        }
        location ~ \.php$ {
            include /etc/nginx/snippets/fastcgi-php.conf;
            fastcgi_pass unix:/run/php/php7.1-fpm.sock;
        }
        location ~ .*\.(gif|jpg|jpeg|png|bmp|swf|mp3)$ {
                expires      30d;
        }

        location ~ .*\.(js|css)?$ {
                expires      12h;
        }
}
consul
什么是consul?
Consul是一个分布式高可用的系统,主要用来做微服务架构的服务发现和服务注册。 它有以下特点:
- 服务发现:用来注册服务,和查找服务。比如注册一个商品服务。客户端通过网关(gateway)获取并且调用服务,获取商品的列表。
- 健康检查:consul可以定时的去检测注册的服务是否可用。当然也可以在调用服务主动检测。
- key/value存储:consul可以将注册的服务,以key/value结构进行数据存储。
- 多数据中心:支持多个数据中心。
安装consul
以ubuntu为例:
$ curl -fsSL https://apt.releases.hashicorp.com/gpg | sudo apt-key add -
$ sudo apt-add-repository "deb [arch=amd64] https://apt.releases.hashicorp.com $(lsb_release -cs) main"
安装
$ sudo apt-get update && sudo apt-get install consul
确认
$ consul version
Consul v1.9.4
Revision 10bb6cb3b
Protocol 2 spoken by default, understands 2 to 3 (agent will automatically use protocol >2 when speaking to compatible agents)
更多安装参数参考: Install Consul | Consul - HashiCorp Learn
consul启动
完成Consul的安装后,必须运行agent。 agent可以运行为server或client模式。每个数据中心至少必须拥有一台server。 建议在一个集群中有3或者5个server。部署单一的server,在出现失败时会不可避免的造成数据丢失。
其他的agent运行为client模式。一个client是一个非常轻量级的进程。用于注册服务,运行健康检查和转发对server的查询。agent必须在集群中的每个主机上运行。
我们准备两台机器:192.168.8.129与192.168.8.130
130作为server,129作为consul的client,理论上集群需要3到5台的server。这里我们暂时以1台server,一台client为例。
-
在130上启动consul server:
consul agent -server -bootstrap-expect 1 -data-dir /tmp/consul -node=s1 -bind=192.168.8.130 -rejoin -config-dir=/etc/consul.d/ -client 0.0.0.0注意:-bootstrap-expect :在一个datacenter中期望提供的server节点数目,当该值提供的时候,consul一直等到达到指定sever数目的时候才会引导整个集群,该标记不能和bootstrap共用。
更多参数参考Consul 使用手册
-
在129上启动consul client,并join到130,启动集群,130就会被推举为leader:
consul agent -data-dir /tmp/consul -node=s2 -bind=192.168.8.129 -config-dir=/etc/consul.d/ -join 192.168.8.130 -
consul ui
130上启动时,会自动安装consul管理后台web服务。
访问:http://192.168.8.130:8500/ ,即可访问consul的web服务。
如果-client指定了内部私有地址,只允许内部访问,但外部又想访问时,可以通过nginx反向代理,nginx配置:
server {
        listen 80;
        server_name consul.130.com;
        location / {
                proxy_pass http://127.0.0.1:8500;
                proxy_redirect      default;

        }
}
php-consul
这里我们使用了一个半成品,方便查看源码。
我们将分别介绍两个php-consul-sdk。
tsingchan/php-consul
tsingchan/php-consul: consul http api php sdk //www.consul.io/api/index.html
这里暂时只是为了验证,还没有采用composer,后续会采用composer进行安装。
下载到extend目录
\---extend
    |
    \---Consul
        |   Agent.php
        |   autoLoad.php
        |   ConsulClient.php
        |   ConsulManage.php
        |   ConsulResponse.php
        |   Discovery.php
        |   Http.php
        |   Service.php
        |
        \---Service
                Agent.php
                Catalog.php
                Health.php
                Kv.php
                Service.php
服务配置
rpcServiceConfig.php
/**
* @param string $id   //服务id 要求唯一
* @param string $name //服务名称 可存在相同服務名稱
* @param string $ip   //服务注册到consul的IP,服务发现,发现的就是这个IP
* @param array $tags //服务tag,数组,自定义,可以根据这个tag来区分同一个服务名的服务,array('secure=false')代表是当前http协议,array('secure=true')代表当前https,数组内容自行增减
* @param object $meta //Meta KV
* @param integer $port //服务IP对应端口号,
* @param string $healthCheckIp  //健康检查ip,一般与注册ip相同,需拼接协议
* @param integer $healthCheckPort  //健康检查ip对应端口
* @param string $healthCheckPath  //与IP和port拼接作为健康检查接口,对应的path,如:consul/health
* @param string $interval  //健康检查间隔时间,默认每隔10s,调用一次拼接好的健康检查地址URL
 */
return [
    "user"=>[
        "config"=>[
            "httpType"=>"http://",
            "secure"=>"secure=false",
            "ip"=>"192.168.8.130",
            "port"=>8093,
            "name"=>"yarrpc",
            "id"=>"user",
            "tags"=>["user.php"],
            "meta"=>["path"=>"/User.php"],
            "healthCheckPath"=>"health.php",
            "interval"=>"10s",
            "consulNode"=>"http://192.168.8.129:8500",
        ],
        "status"=>true,//是否要注册到consule
    ],
    "operator"=>[
        "config"=>[
            "httpType"=>"http://",
            "secure"=>"secure=false",
            "ip"=>"192.168.8.130",
            "port"=>8093,
            "name"=>"yarrpc",
            "id"=>"operator",
            "tags"=>["operator.php"],
            "meta"=>["path"=>"/Operator.php"],
            "healthCheckPath"=>"health.php",
            "interval"=>"10s",
            "consulNode"=>"http://192.168.8.129:8500",
        ],
        "status"=>true,//是否要注册到consule
    ],
];
服务注册、注销、发现
-
curl
我们先看通过curl直接完成consul http api的服务注册,就更好理解php-consul的基本使用方式:
curl --request PUT --data @register.json http://192.168.8.129:8500/v1/agent/service/registerregister.json
{ "Id":"yarrpc-id", "Name":"yarrpc", "Tags":[ "test" ], "Address":"192.168.8.130", "Port":8093, "EnableTagOverride":false, "Check":{ "DeregisterCriticalServiceAfter":"90m", "HTTP":"http://192.168.8.130:8093/health.php", "Interval":"10s" } } -
php
根据consul http api实现封装php类库方法
简单范例:consul.php
use Consul\ConsulManage;

include_once dirname(__DIR__). '/extend/Consul/autoLoad.php';


$serviceId = "user";//注意要先对服务进行配置,详见ConsulManage类中的配置属性
//$serviceId = "operator";//注意要先对服务进行配置,详见ConsulManage类中的配置属性

$configFile = (dirname(__DIR__)).DIRECTORY_SEPARATOR."config".DIRECTORY_SEPARATOR."rpcServiceConfig.php";;
$cm = new ConsulManage($configFile);

//注册服务
//$res = $cm->registerService($serviceId);
//var_dump($res);

////注销服务
//$res = $cm->deregisterService($serviceId);
//var_dump($res);

//发现服务
//$service= $cm->getServiceById($serviceId);
//var_dump($service);

//var_dump($cm->getServiceByName("yarrpc"));//随机返回name为yarrpc的一个服务
//var_dump($cm->getServicesByName("yarrpc"));

////维护 开启维护的服务将不会再被发现
//$enable = false;//关闭维护模式
//$reason = "maintenance 2h";
//$res = $cm->maintenance($serviceId, $enable, $reason);
//var_dump($res);
client端调用服务
//clientCommon.php

use Consul\ConsulManage;

include_once dirname(__DIR__) . '/extend/Consul/autoLoad.php';

/**
 *
 * @param type $serviceId
 * @return string
 */
function get_yar_rpc_service_url($serviceId)
{

    $url = '';
    if ($serviceId) {
        $configFile = (dirname(__DIR__)).DIRECTORY_SEPARATOR."config".DIRECTORY_SEPARATOR."rpcServiceConfig.php";;
        $cm = new ConsulManage($configFile);
        $config = $cm->getServiceConfig($serviceId);

        $service = $cm->getServiceById($serviceId);
        if (is_array($service)) {
            $url = $config['config']['httpType'] . $service['Address'] . ":" . $service['Port'];
            $meta = $service['Meta'];
            $url = isset($meta['path']) ? ($url . $meta['path']) : $url;
        }
    }
    return $url;
}

//userClient..php
// include_once "clientCommon.php";

try {
    //$host = "http://192.168.8.130:8093";
    $url = get_yar_rpc_service_url($serviceId = "user");

    //@todo 进一步封装yar_client的封装
    //发起一个RPC调用, 并且得到返回值. 如果服务端的远程调用抛出异常, 那么本地也会相应的抛出一个Yar_Server_Exception异常.
    $client = new yar_client($url);

    //设置调用远程服务的一些配置, 比如超时值, 打包类型等.
    //可以是: YAR_OPT_PACKAGER、YAR_OPT_PERSISTENT (需要服务端支持keepalive)、YAR_OPT_TIMEOUT、YAR_OPT_CONNECT_TIMEOUT
    //Set timeout to 1s
    $client->SetOpt(YAR_OPT_CONNECT_TIMEOUT, 1000);
    //Set packager to JSON
    //$client->SetOpt(YAR_OPT_PACKAGER, "json");//默认php, "php", "json", "msgpack",this server accept json packager
    //设置header
    $client->SetOpt(YAR_OPT_HEADER, array("hd1: val", "hd2: val"));  //Custom headers, Since 2.0.4


    var_dump($client->getName());
    var_dump($client->getInfo());
} catch (Yar_Server_Exception $sex) {
    //Yar_Server_Exceptioin可以捕获server端throw new exception异常
    var_dump($sex->getTraceAsString());
} catch (Yar_Client_Exception $cex) {
    //处理Yar_Client_Exception
    var_dump($cex->getTraceAsString());
}catch(\Exception $ex){
    var_dump($ex->getTraceAsString());
}


//operatorClient.php
// include_once "clientCommon.php";

try {
    //$host = "http://192.168.8.130:8093";
    $url = get_yar_rpc_service_url($serviceId = "operator");

    //@todo 进一步封装yar_client的封装
    //发起一个RPC调用, 并且得到返回值. 如果服务端的远程调用抛出异常, 那么本地也会相应的抛出一个Yar_Server_Exception异常.
    $client = new yar_client($url);

    //设置调用远程服务的一些配置, 比如超时值, 打包类型等.
    //可以是: YAR_OPT_PACKAGER、YAR_OPT_PERSISTENT (需要服务端支持keepalive)、YAR_OPT_TIMEOUT、YAR_OPT_CONNECT_TIMEOUT
    //Set timeout to 1s
    $client->SetOpt(YAR_OPT_CONNECT_TIMEOUT, 1000);
    //Set packager to JSON
    //$client->SetOpt(YAR_OPT_PACKAGER, "json");//默认php, "php", "json", "msgpack",this server accept json packager
    //设置header
    $client->SetOpt(YAR_OPT_HEADER, array("hd1: val", "hd2: val"));  //Custom headers, Since 2.0.4


    /* 远程调用方式1: call directly */
    var_dump($client->add(1, 2));

    /* 远程调用方式2: call via __call */
    var_dump($client->__call("add", array(3, 2)));
    var_dump($client->returnArray());
    var_dump($client->add(0, 2));//远端服务端抛出异常
} catch (Yar_Server_Exception $sex) {
    //Yar_Server_Exceptioin可以捕获server端throw new exception异常
    var_dump($sex->getTraceAsString());
} catch (Yar_Client_Exception $cex) {
    //处理Yar_Client_Exception
    var_dump($cex->getMessage());
    var_dump($cex->getTraceAsString());
}catch(\Exception $ex){
    var_dump($ex->getTraceAsString());
}

/* public以外的方法不能被调用,so __add can not be called */
//var_dump($client->_add(1, 2));
健康检查
我们观察注册服务时的json参数中:Check.HTTP,用作于health检查,比如上面的例子:http://192.168.8.130:8093/health.php ,需要在rpc服务中可访问health.php文件
health.php
header('Content-type: application/json');
echo "SUCCESS";
consul会自动定期去访问检查服务是否有效。
sensiolabs/consul-php-sdk
-
安装
composer require sensiolabs/consul-php-sdk -
初步使用
获取所有consul服务成员
include_once dirname(__DIR__).DIRECTORY_SEPARATOR."autoLoad.php";

$agent = getAgent();

$services = $agent->members();
print_r(json_decode($services->getBody()));

/**
* 获取agent实例
* 注意:使用这个函数主要是为了IDE方便自动完成
* @return \SensioLabs\Consul\Services\Agent
*/
function getAgent(){
    $options = ['base_uri'=>"http://192.168.8.130:8500"];
    $sf = new \SensioLabs\Consul\ServiceFactory($options);
    return $sf->get(\SensioLabs\Consul\Services\AgentInterface::class);
}
注册pay服务:
include_once dirname(__DIR__).DIRECTORY_SEPARATOR."autoLoad.php";

$registerData = '{"Id":"pay","Name":"webpay","Tags":["pay"],"Meta":{"path":"/pay.php"},"Address":"192.168.8.130","Port":8093,"EnableTagOverride":false,"Check":{"DeregisterCriticalServiceAfter":"90m","HTTP":"http://192.168.8.130:8093/health.php","Interval":"10s"}}';
$client = getAgent();
$res = $client->registerService($registerData);

/**
* 获取agent实例
* 注意:使用这个函数主要是为了IDE方便自动完成
* @return \SensioLabs\Consul\Services\Agent
*/
function getAgent(){
    $options = ['base_uri'=>"http://192.168.8.130:8500"];
    $sf = new \SensioLabs\Consul\ServiceFactory($options);
    return $sf->get(\SensioLabs\Consul\Services\AgentInterface::class);
}
获取yarrpc服务信息:
include_once dirname(__DIR__).DIRECTORY_SEPARATOR."autoLoad.php"; $client = getHealth(); $services = $client->service("yarrpc"); print_r(json_decode($services->getBody())); /** * 获取health实例 * 注意:使用这个函数主要是为了IDE方便自动完成 * @return \SensioLabs\Consul\Services\Health */ function getHealth(){ $options = ['base_uri'=>"http://192.168.8.130:8500"]; $sf = new \SensioLabs\Consul\ServiceFactory($options); return $sf->get(\SensioLabs\Consul\Services\HealthInterface::class); } -
使用感受
- 对consul http api的实现比较完整、易用性也比较强
- 源码注释基本没有,对IDE支持不友好,比如初始化工厂类时的配置,没有options的相关说明,需要看源码,http的返回结果ConsulResponse类,IDE上不能自动完成识别显示相关方法,需要自己手动查看源码,才知道有getBody等方法。
- 参数保留consul api原生,没有额外封装,比如agent的register接口,涉及的参数很多,该php sdk仍然保留和consul api一样传入一个json串
- 由于consul api文档比较健全,所以用起来相对舒服,只要再补充上sdk里代码注释与IDE helper会更好。
consul命令
Commands | Consul by HashiCorp
查看consul所有命令:
$ consul
Usage: consul [--version] [--help] <command> [<args>]
查看agent 的所有选项:
consul agent -h
发现服务缓存
在发现服务环节,我们可以通过常规的缓存机制对consul返回的服务列表信息进行缓存,注意缓存有效时间,及主动更新策略的设计,确保在出现服务节点更新不及时或服务故障时,可以无缝自动简单快速高效地连接服务节点。
consul集群
如何暂停consul及再次恢复
可以考虑通过docker
参考
HTTP API | Consul by HashiCorp
Consul快速入门(二):Consul集群安装部署_风树种子的专栏-CSDN博客
在Consul Service Discovery中注册服务| 领事-HashiCorp Learn
PHP实现consul服务注册与服务发现_allen的博客-CSDN博客
allendaydayup/php-consul: 多了解官方API就好:https://www.consul.io/api/index.html